
Shopify Setup
Add a live delivery promise to your Shopify product pages — a small badge that tells shoppers "Order within 4h 12m → arrives Tuesday, Jun 24."
It only appears when the item genuinely arrives fast, so it can only help conversions: it will never show a slow or risky promise. If anything isn't ready, the badge simply stays hidden.
Time to set up: ~15 minutes. You'll need: access to your Shopify admin, and your product IDs (SPINs) from your Spreetail contact.
Step 1 — Get your product IDs (SPINs)
Ask your Spreetail Account Manager for the SPIN of each product you want the badge on. A SPIN is Spreetail's Product Identification Number that tells PromisePro which item to estimate. (One per product, or per variant if your products have variants.)
Step 2 — Create the "PromisePro SPIN" field (one time, ~2 min)
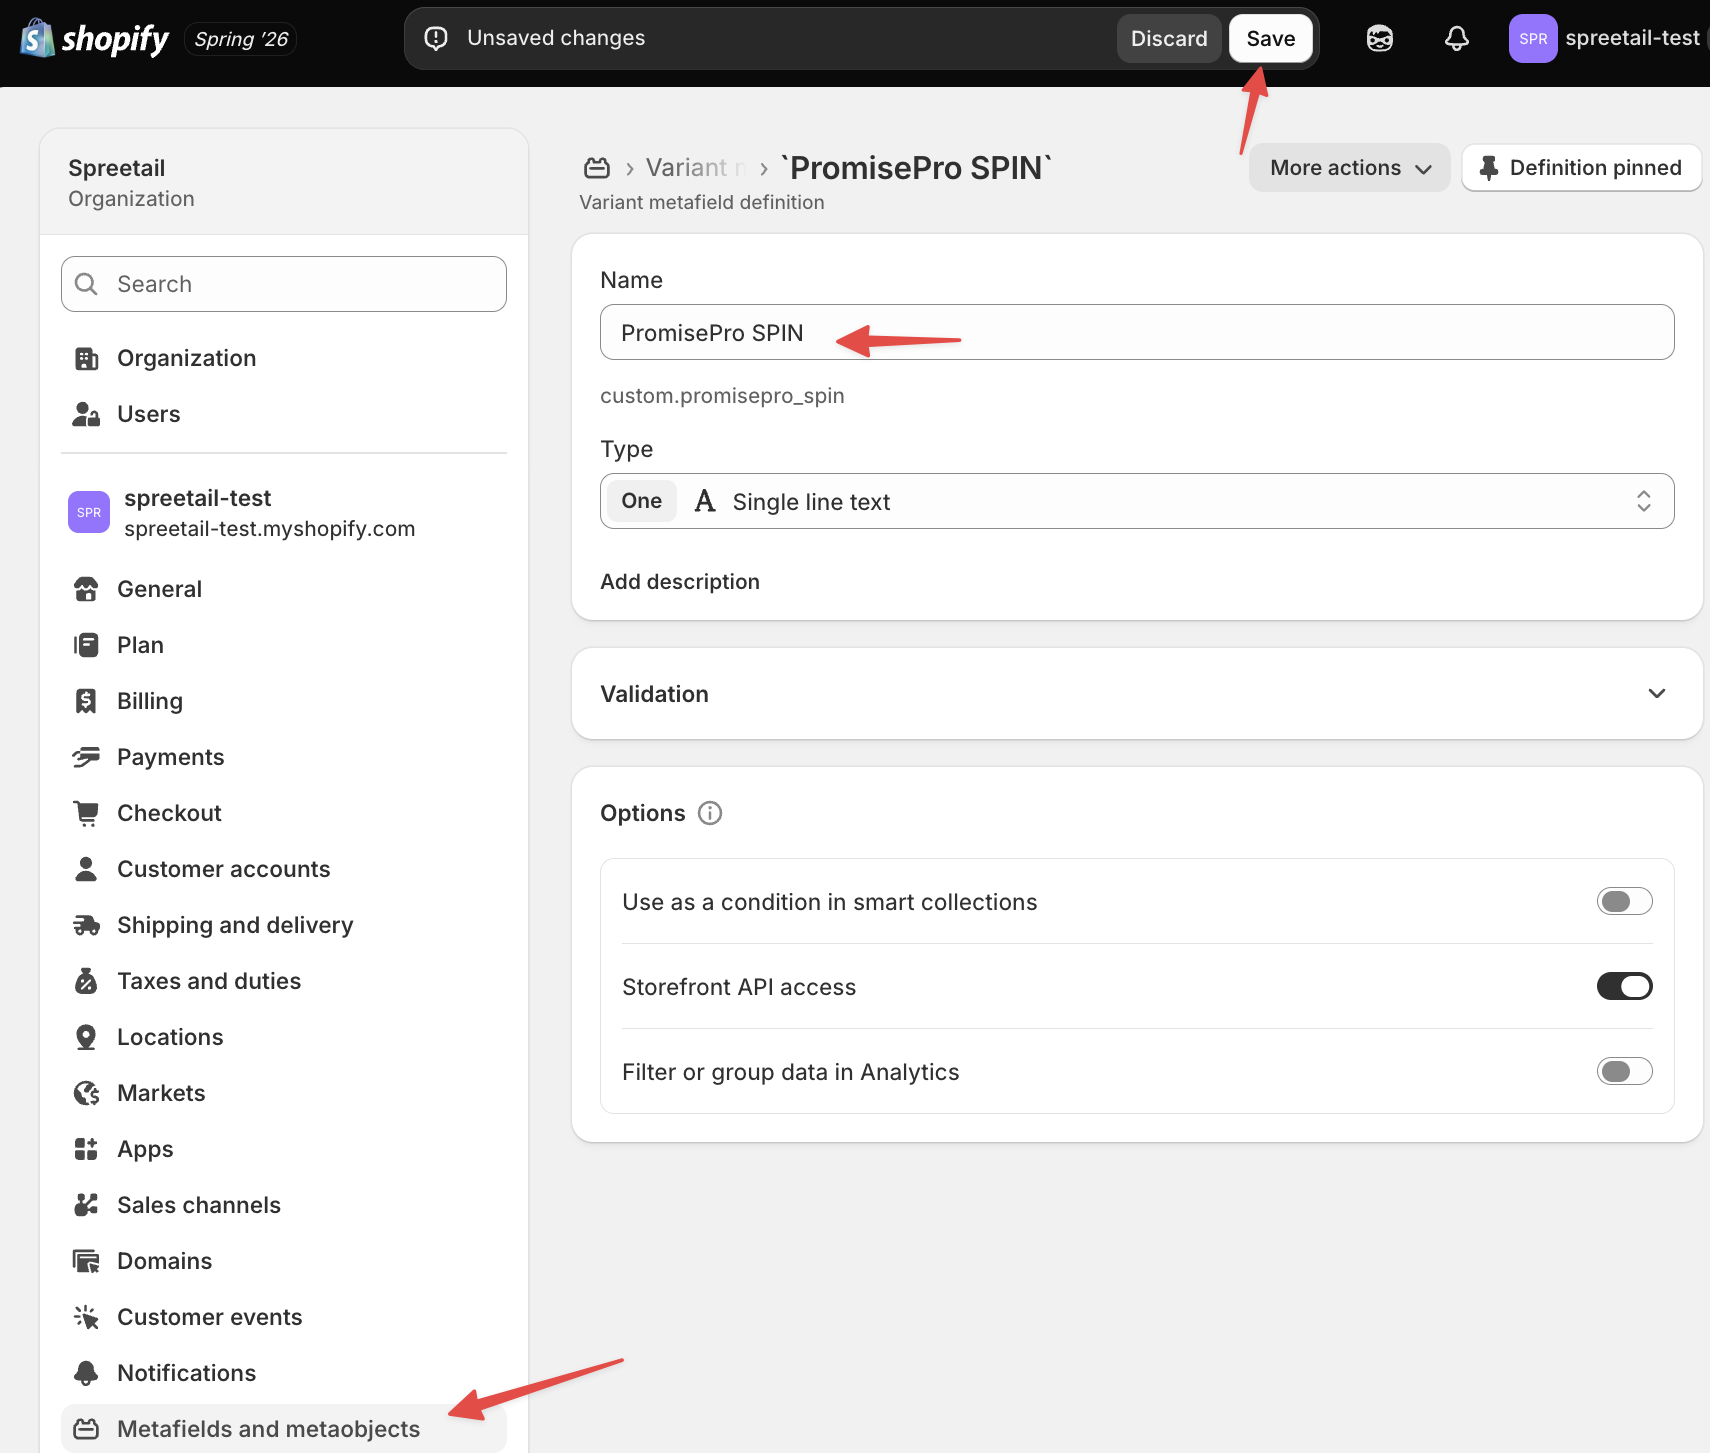
This lets you store a SPIN on each product.
- In Shopify admin, go to Settings → Metafields and metaobjects → Variants.
- Click Add definition.
- Name:
PromisePro SPIN - Verify Namespace and key is 'custom.promisepro_spin'.
- Set the Type to One value - Single line text.
- Turn on Storefront access (so the badge can read it).
- Save.
Bundles? Add a second field for the SPIN listIf a product is a bundle — one listing you sell that Spreetail ships as several separate items — create a second field the same way:
- Name:
PromisePro SPIN List- Namespace and key:
custom.promisepro_spin_list- Type: One value — JSON
- Turn on Storefront access and Save.
Its value is a JSON array of the component SPINs and quantities, e.g.
[{"spin":427936,"qty":2},{"spin":427937}](qtyis optional and defaults to 1). When this field is set on a product, the badge estimates the whole bundle together. Your Spreetail contact can give you the exact list for each bundle.Use the JSON type (not plain text): Shopify then validates the value when you save, so a typo is caught immediately instead of silently hiding the badge later.
Step 3 — Add a SPIN to each product
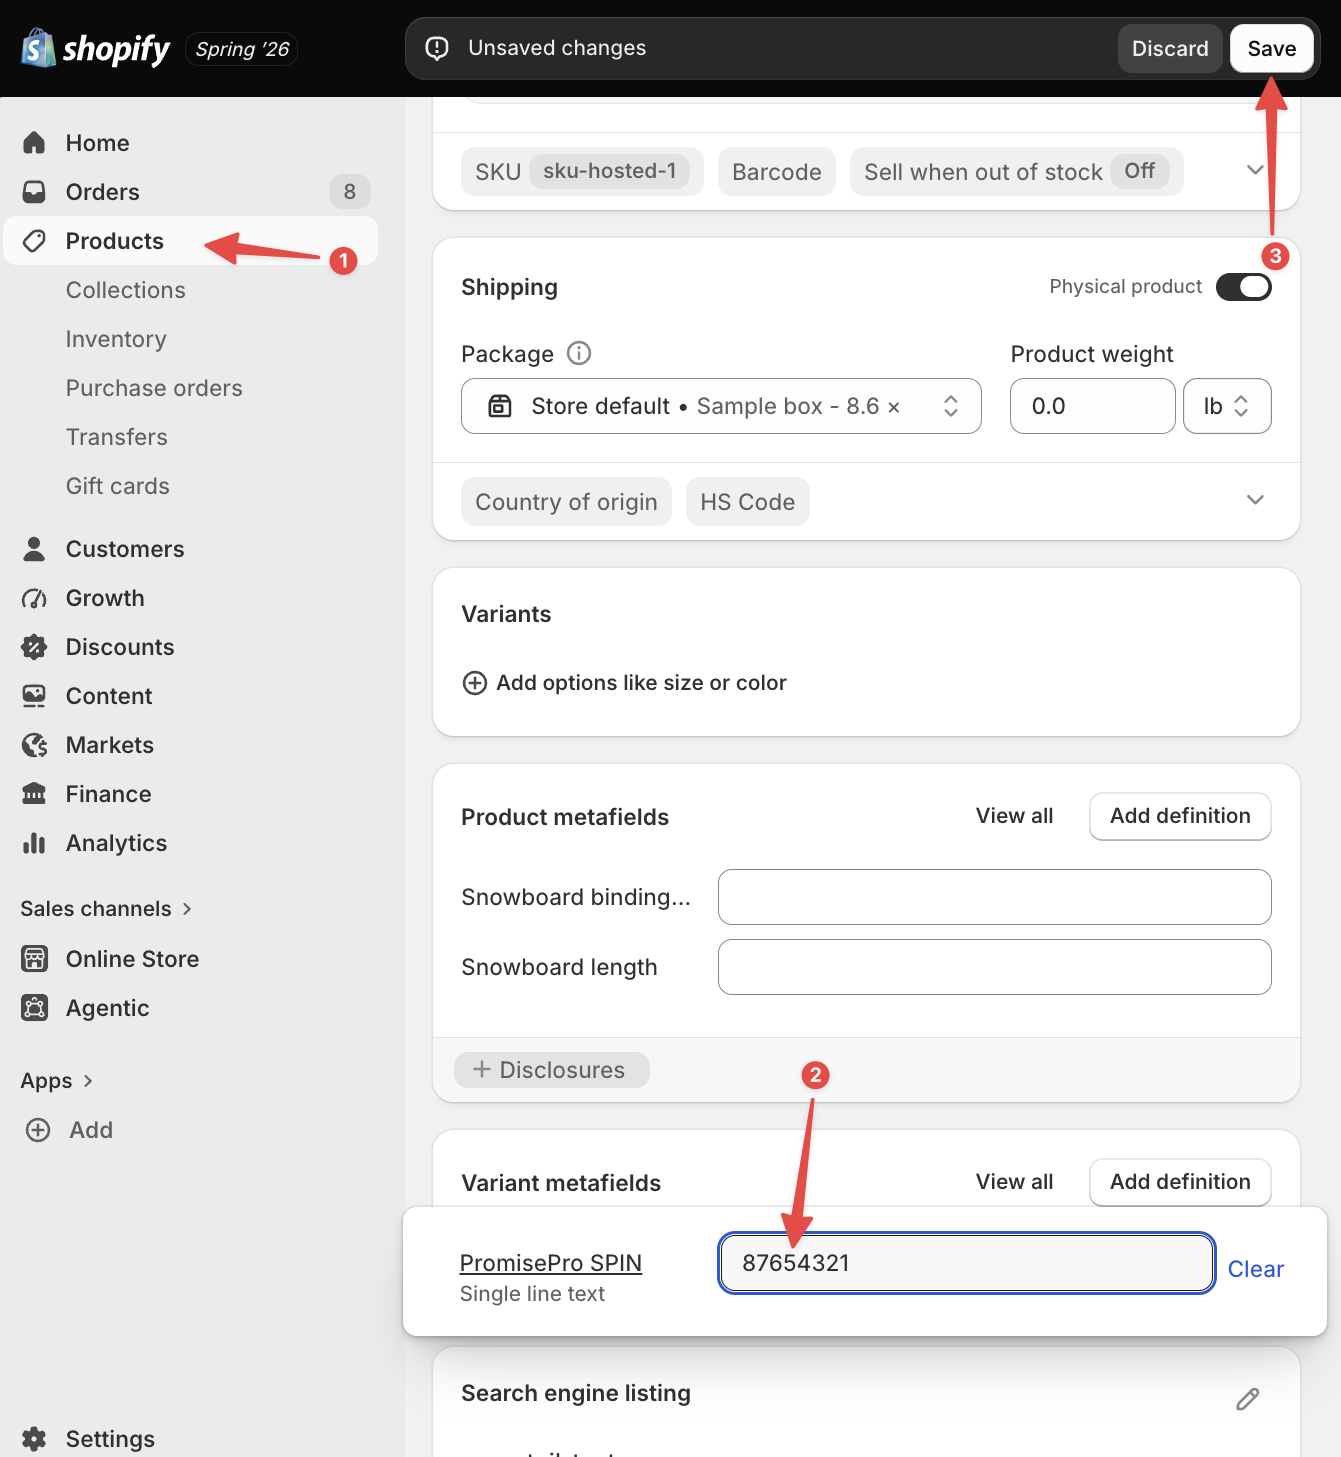
- Go to Products and open a product.
- Find the Metafields section (or open the specific variant).
- In PromisePro SPIN, paste that product's SPIN.
- Save. Repeat for each product you want the badge on.
No SPIN, no badgeA product without a SPIN just won't show the badge — nothing breaks. So you can roll it out to a few products first.
Step 4 — Turn on the badge in your theme (one quick code step)
You'll add a Custom Liquid block in the theme editor and paste in one snippet — no theme-code files to touch.
-
Go to Online Store → Themes → Customize.
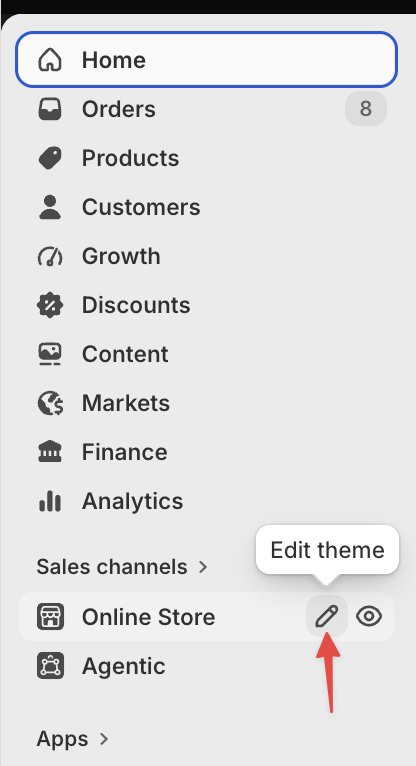
-
In the top bar, switch the template to Products (open any product so you can see the preview).
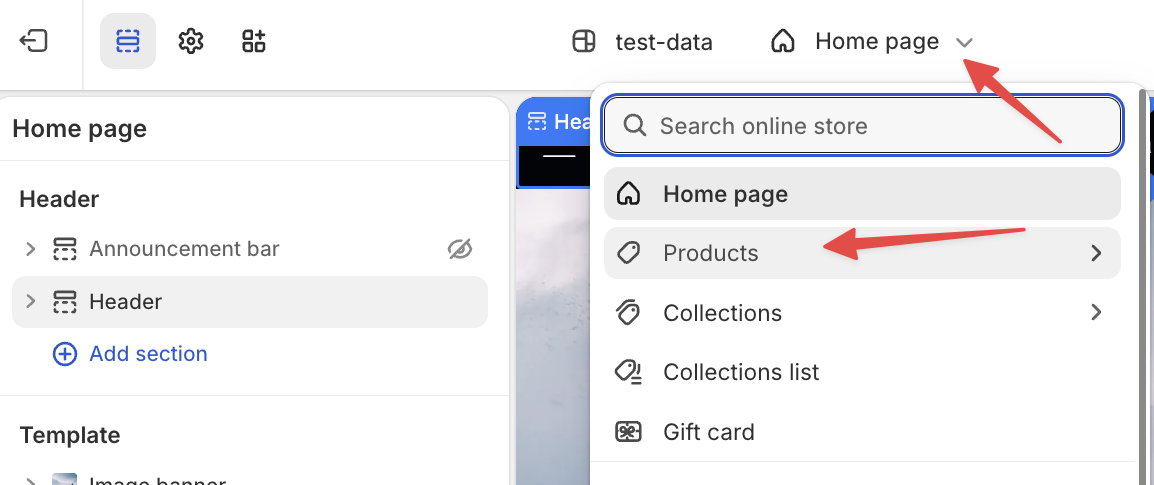
-
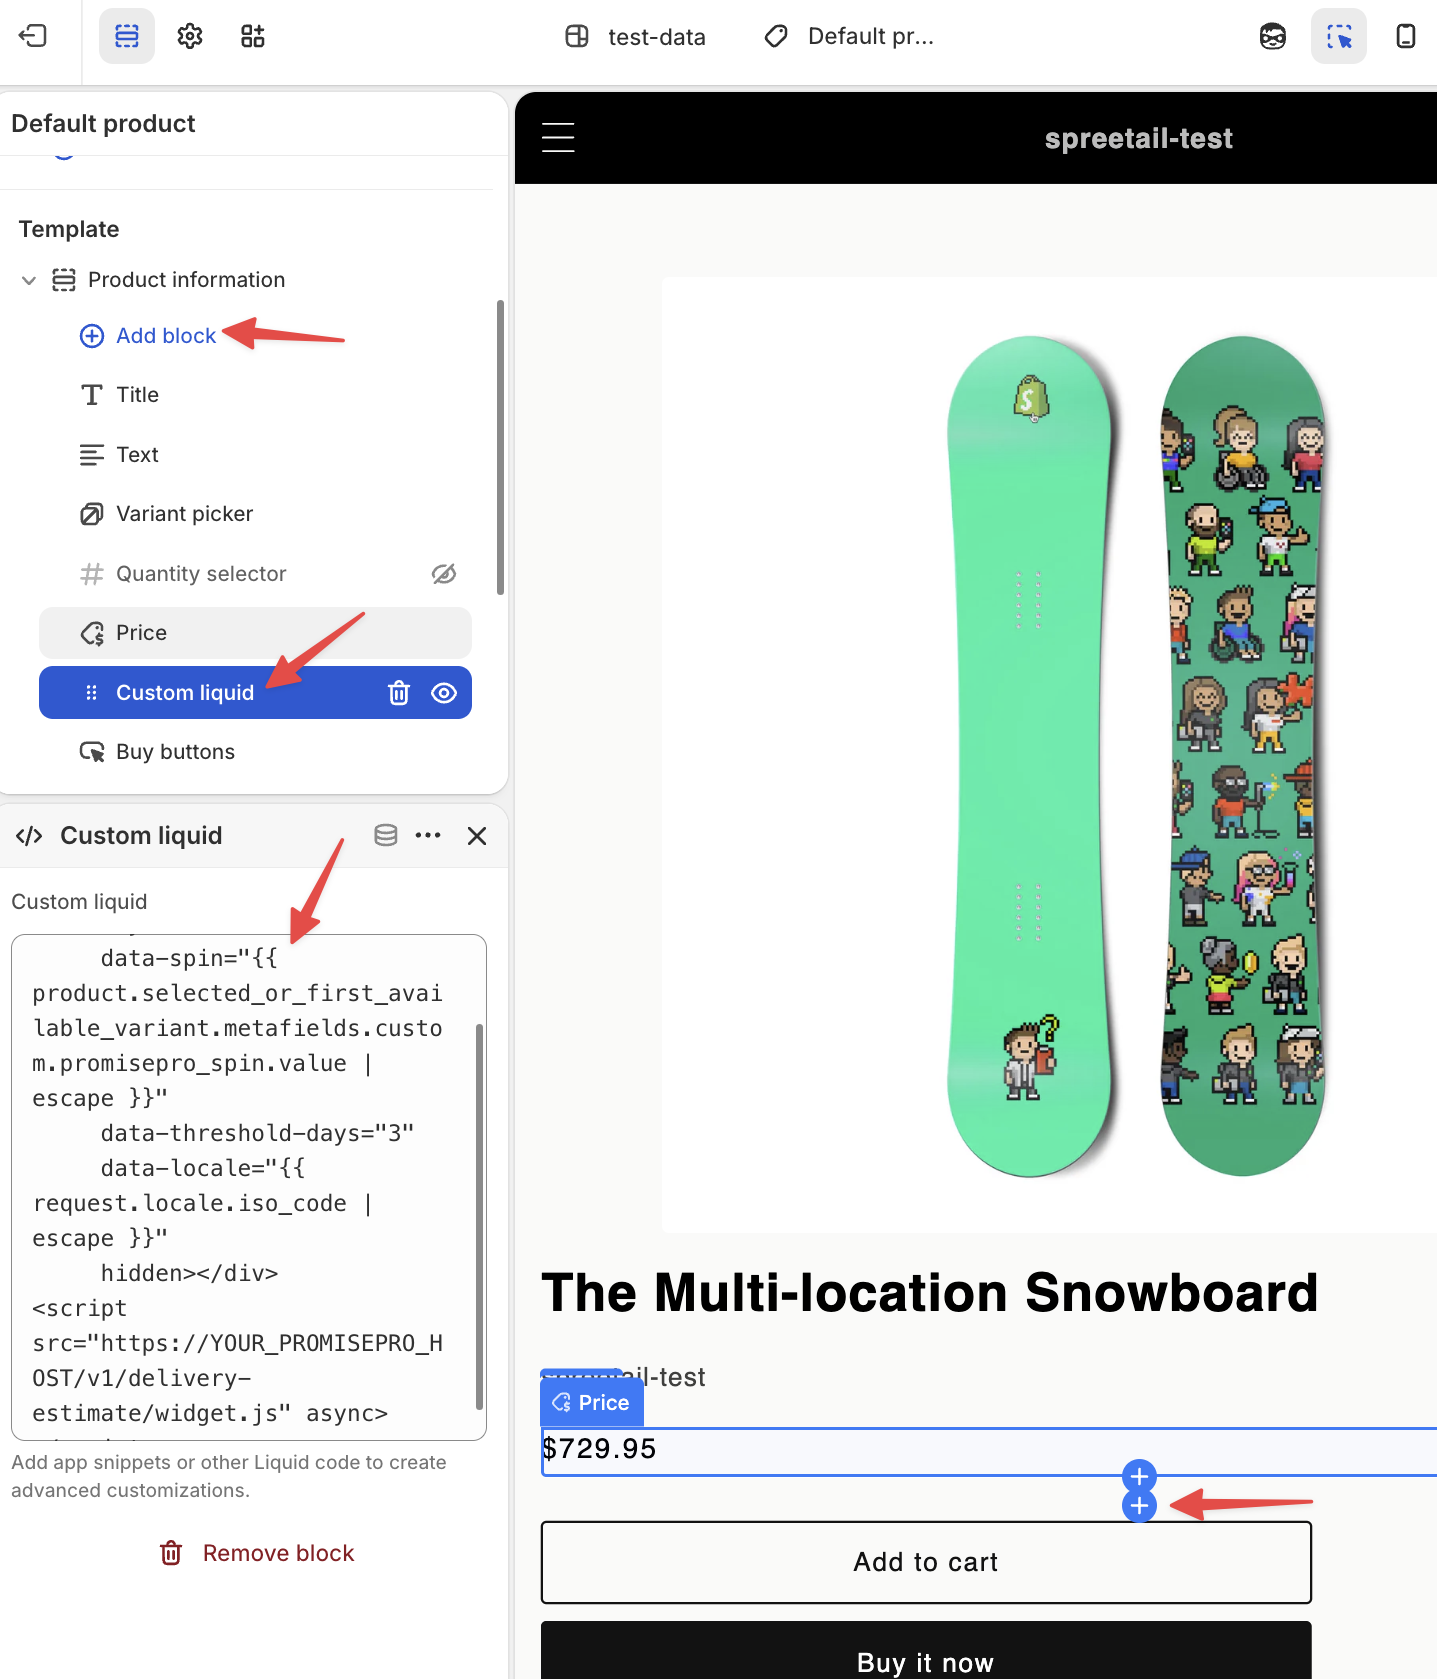
In the product area, click Add block → Custom Liquid, and position it where the badge should appear (e.g. under the price or the Add-to-Cart button).
-
Paste the block below into it
<div id="promisepro-delivery"
     class="promisepro-delivery"
     data-spin="{{ product.selected_or_first_available_variant.metafields.custom.promisepro_spin.value | escape }}"
     data-spin-list="{{ product.selected_or_first_available_variant.metafields.custom.promisepro_spin_list.value | json | escape }}"
     data-threshold-days="3"
     data-cutoff-offset="20"
     data-locale="{{ request.locale.iso_code | escape }}"
     hidden></div>
<script src="https://api.spreetail.com/api/v1/delivery-estimate/widget.js" async></script>
One snippet covers bothThis block works for regular products and bundles. When a product has a PromisePro SPIN List (from the bundle callout in Step 2), the badge automatically estimates the whole bundle; otherwise it falls back to the single PromisePro SPIN. If you're not using bundles, you can leave out the
data-spin-listline.
- Click Save.
Prefer a reusable snippet?A developer can instead add
promisepro-delivery.liquidto the theme'ssnippets/folder and render it with{% render 'promisepro-delivery', product: product %}. The Custom Liquid block above is the no-code-editor path and does the same thing.
Step 5 — Style it to match your brand (optional)
To match your store's look, add a style attribute to the root <div> in Step 4 with any of these:
| What to change | Variable to set | Example |
|---|---|---|
| Brand/accent color | --promisepro-accent | #0a7d55 |
| Card background | --promisepro-bg | #ffffff (white / light theme) |
| Text color | --promisepro-color | #111111 |
| Countdown/urgency color | --promisepro-urgent-color | #d9534f |
| Corner roundness | --promisepro-radius | 8px |
| Card width | --promisepro-max-width | 420px |
Pinning light or dark: because each variable adapts independently, setting only the background (or only the text) can leave the other color following the shopper's system theme and look wrong. To lock a fixed look, set --promisepro-bg and --promisepro-color together (plus your accent). The full variable list and a copy-paste "restore classic dark" snippet are in the Developer Guide.
Add them to the same <div> from Step 4 — for example, a light-themed card with your brand green:
<div id="promisepro-delivery"
     class="promisepro-delivery"
     data-spin="..."
     data-threshold-days="3"
     data-locale="..."
     style="--promisepro-accent:#0a7d55; --promisepro-bg:#ffffff; --promisepro-color:#111111; --promisepro-radius:8px;"
     hidden></div>
Skipping this step leaves the default adaptive theme, which follows the shopper's system light/dark preference automatically. To pin one fixed look regardless of system theme, set --promisepro-bg, --promisepro-color, and --promisepro-accent together.
Step 6 — Preview it
- Open one of your product pages (one that has a SPIN set).
- Enter a ZIP code when prompted (shoppers do this once; it's remembered).
- If the item ships fast to that ZIP, the badge appears with a live countdown. 🎉
If it doesn't appear, that usually means delivery to that ZIP isn't fast enough (the badge is doing its job by staying hidden), or the SPIN isn't set yet.
Good to know
- It never overpromises. The badge only shows on a confirmed fast delivery; anything else (slow, out of stock, no route) shows nothing.
- Bundles are all-or-nothing. For a product with a SPIN List, the badge shows a single promise for shipping the whole bundle together — and only when every component is in stock and fast enough to that ZIP. If any one component isn't, the bundle badge stays hidden (even if the other components would qualify on their own).
- Shoppers enter their ZIP once. It's remembered, with a "Change ZIP" link.
- Match your brand. The badge can use your brand color and styling — ask your developer to set it (one line). Defaults look good out of the box.
- Languages. English and Spanish are supported; it follows your store's language.
- Roll out gradually. Start with a handful of products (just set their SPINs), then expand.
Need help?
Reach out to your Spreetail Account Manager for your store's setup details if the badge isn't appearing the way you expect.
Updated about 2 months ago